-
Tool Hire
Access & Powered Access Breaking & Drilling Building & Siteworks Carpet Cleaners Cleaning & Floorcare Concreting & Preparation Cooling, Heating, Drying Event Fixing Tools Gardening Ladders Lifting & Handling Lighting & Power Painting & Decorating Plumbing & Pumping Powered Access Safety & Ventilation Sanders Sawing & Cutting Skip Hire Surveying & Location Welding Hilti Products
- Find a Branch
- Tips & Advice
- FAQ
- Contact Us
Home How to fell a tree
This guide covers basic felling and manual take downs of single trees in open spaces. Before beginning, you must assess the site of the tree felling and consider the any effect the weather may have on the process. In terms of the equipment being used, never push the equipment beyond its limits. If it will not do what you want with reasonable ease and speed, assume you have the wrong tool for the job and contact your local HSS.
Equipment required
Safety gear aside, you will need a;
Preparation
It is important to remember that felling a tree is a one-person operation. A safe method of operation must be agreed to ensure a safe working distance can be maintained between workers (at least two tree lengths) and between workers and machinery (outside the risk zone of the machines being used). Ensure all underground and overhead services such as gas, water, sewage, electricity and telephones have also been identified before felling. Do not fell if wind conditions are such that control over the felling direction might be lost, and look out for dead wood, insecure branches and any signs of decay any trees to be felled. Decide the direction of fall and select a suitable escape route, ensuring the route is clear of obstructions. Remove debris from around the base of the tree and any soft vegetation which might obstruct the operation. When removing branches from the tree using a long reach pruner, ensure you are protected from falling branches. Do not use a chainsaw above shoulder height.
Limbering
Limbering involves cutting off the branches of the tree. Use a long reach pruner and cut the necessary branches, keeping aware of any falling branches. Remember to carrying out any limbering on the uphill side of the tree to avoid any rolling branches.
Felling
Always make a sink, which allows the tree to be felled on a hinge that controls the rate and direction of fall. Felling is done using three cuts. First you make the directional cuts, which consist of the top cut and the bottom cut, then you finish with the felling cut. By placing these cuts correctly you can control the felling direction very accurately.
Directional cuts
To make the directional cuts you begin with the top cut. Stand to the right of the tree and cut on the pull stroke. Next make the bottom cut so that it finishes exactly at the end of the top cut. The directional cuts should run 1/4 of the diameter through the trunk and the angle between the top cut and bottom cut should be 45. The line where the two cuts meet is called the directional cut line. This line should be perfectly horizontal and at right angles (90?) to the chosen felling direction.
Felling cut
The felling cut is made from the opposite side of the tree and it must be perfectly horizontal. Stand on the left side of the tree and cut on the pull stroke. Make the felling cut about 3-5 cm (1.5-2 inches) above the bottom directional cut. Once any felling cut has been started on a tree, the tree must not be left standing. Do not start a new operation until the tree has fallen. When the tree does start to fall, step back and to the side where you have your escape route planned. Be careful and watch out for falling branches and tops. Also beware of the butt rebounding.
Manual Takedown
Try and take down the hung-up tree immediately. If this cannot be done, establish exclusion zones. Ensure there is no other person within distance equal to twice the length of the tree or directly below on steep slopes. Carefully assess the tree to decide the safest and most effective method of takedown, making sure you identify the danger areas around the tree. Using a chainsaw, remove part or the entire hinge, working from a safe position at the side of the tree. When rolling lodged trees use a pushing movement and maximise leverage and muscular effort by keeping the lever between waist and chest height. When moving the butt using a pole as a lever, keep behind the pole, using your legs to push. As the tree begins to fall, let go of the pole or lever.
Removing the stump
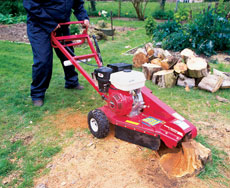
The remove the tree stump you will need a tree stump grinder. Remove all rocks and debris away from the stump and surrounding areas to avoid damage to the grinder wheel. Use the chainsaw to chop off as much of the stump as you can. Position the grinder in front of the stump. Raise the grinder wheel a few inches above the stump, keeping close to the edge of the stump. Spin the grinder wheel and lower it into the stump. Move the wheel from side-to-side to clear out wood chips and raise the wheel, moving further into the tree stump. Repeat the process until the stump is thoroughly chopped and there is at least a 4-inch hole where the stump used to be.


